This week our host was Lovely Kimmie and we all met at
Everlasting Bloom in Grand Rapids, Mi. Upon our arrival we were greeted with boxed lunches by Honey Baked Hams and refreshing drinks. Our table was set with the colors of spring, and our hostess added the pop of color with the addition of bright garden gloves and flowers at each table setting.
The day was bright and sunny and infused with pops of color from our table setting. Thank you Kimmie for another creative tablescape.
Our box lunch with our little take away gift of work gloves. What a great idea! This was genius for the lovelies with gorgeous nails.
This enormous planter was at one end of our table and it was filled with the most beautiful succulents.
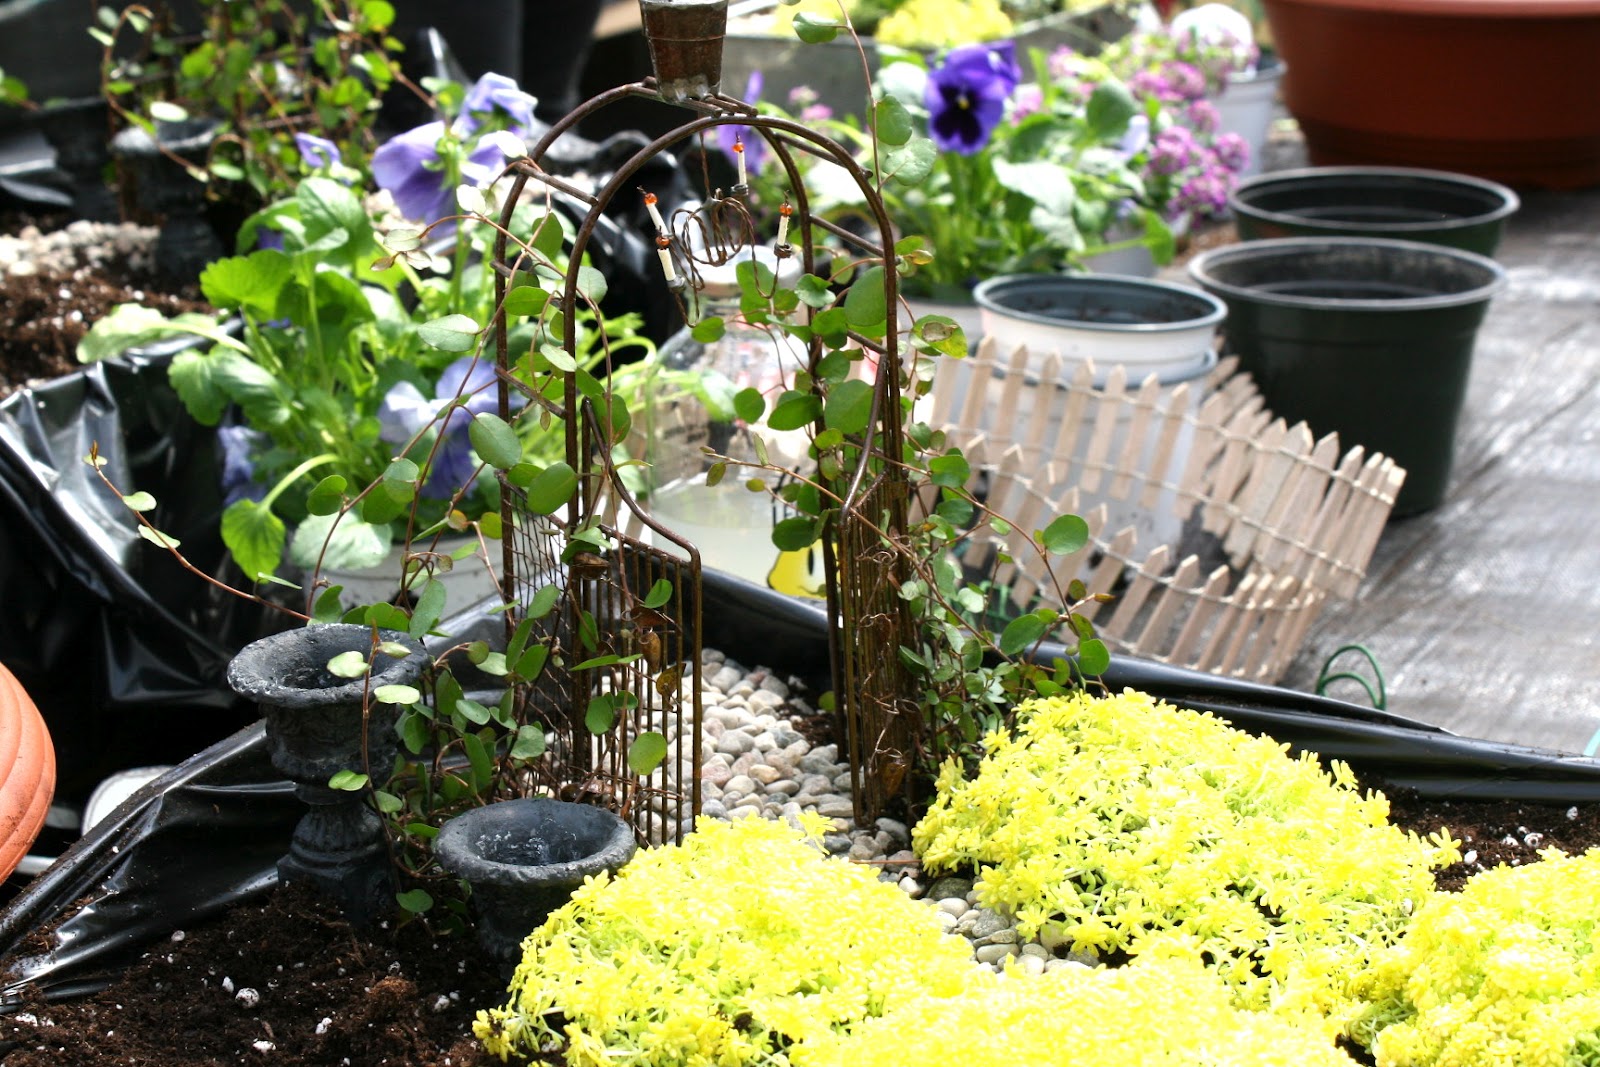
Our lovely host had a plan for DIY Fairy Gardens made of plants, flowers, pebbles, succulents, mini bridges, tiny clay pots, ponds and of course fairies. The possibilities were endless. Kimmie scheduled a private time for us in the store with Kathy, and after a few minutes of instruction, we were cut lose in a house of flowers and fairies.
Kim has raided her attic and she had many containers for us to choose from. She had wicker baskets, tin containers, wooden boxes and ceramic pots. Pictured here is a metal container with a small garden filled with succulents and plants along with a gate, pebbles, bird house and a wheelbarrow.
Another picture of the same garden. When making this fun project, you could almost use anything for your mini garden. Just remember to line it, and your good to go.
A round metal bucket here for another inspiration we could draw from. This one had more flowers.
Close up of the fairy and her garden tools.
Here you can see that the flower shop used a radio flyer for their garden! It looks like a vintage wagon. I am sure I could find something in my garage to use. Oh the possibilities.
Oh yes a close up of our flowers! They were our dessert after our boxed lunch. From a distance they looked like real tulips. I didn't realize what they were until I sat down. Oh how clever and fitting for the day.
Check out the gummie worms. I think that we loved the dirt dessert and enjoyed eating them as much as any kid would.
Our group for the day. Top left: Laure Top middle: Kimmie Top right: Jenny
Lower left: Christy Lower middle: Betsy and Me (Tina) Lower right
What a great impact when flowers are placed all together.
Here's one of our containers.
First you line the container with a garbage bag and wrap over the top. If you are taking the container outside then you might want to make sure that you have drainage holes. If you are keeping it inside than you don't need the holes.
Fill container with dirt to the top and put your plants close so you can just grab them.
I picked mine out before I got started.
Think about where your going to put your little walk way, bridges, ponds etc...plan abit in your head.
Kathy the owner giving Betsy some helpful hints that make the transplanting go easier.
Jenny contemplating her garden.
Close up of my garden, love the black urns.
Lauries almost done, what a sweet little magical place.
Betsys finished garden. Can you spot her fairy?
Christy is working hard.
I love Christys round container.
Kimmies garden. I want to sit in that chair and read a good book.
After completing my garden then I need to trim the plastic bag and tuck it down a little so it doesn't show.
These gardens look great in almost any container. This looks like another vintage container to me.
Close up of a mini bistro set and glass cloche. I bet you could find doll house miniatures and add them.
Kim your garden is truly amazing. Thank you so much for a fun, creative and enjoyable day! We are never at a loss for crafts and projects. I know we are all so excited each and every tuesday when the Lovelies meet, just to see what the host comes up with. You outdid yourself, great workshop.
Recipe for the Flower and Dirt Dessert:
Ingredients
- 1/2 cup butter, softened
- 1 (8 ounce) package cream cheese, softened
- 1/2 cup confectioners' sugar
- 2 (3.5 ounce) packages instant vanilla pudding mix
- 3 1/2 cups milk
- 1 (12 ounce) container frozen whipped topping, thawed
- 32 ounces chocolate sandwich cookies with creme filling
Directions
- Chop cookies very fine in food processor. The white cream will disappear.
- Mix butter, cream cheese, and sugar in bowl.
- In a large bowl mix milk, pudding and whipped topping together.
- Combine pudding mixture and cream mixture together.
- Layer in flower pot, starting with cookies then cream mixture. Repeat layers.
- Chill until ready to serve.
- Add artificial silk flower and gummie worms. Enjoy!